Showing posts with label recipes. Show all posts

Friday, April 17, 2015

Cauliflower Pizza Crust

I have seen these Cauliflower Pizza Crusts all over and have always wanted to try one. I would say mine was slightly successful, but I have ideas on how to improve it for next time, it was delicious, mostly I just need to improve the structure of it.


I started off with half a head of cauliflower, and cut the stems off. I made a personal pizza with this amount. After cutting the cauliflower, I placed it in a blender, and blended to rice size pieces. Preheat your oven to 500 degrees. Once the cauliflower is blended, place in a microwave safe bowl, and microwave for 4 minutes. After this, allow the cauliflower to cool for 10 minutes. DO NOT RUSH this step! I cannot stress that enough. You want all of the moisture to be released from the cauliflower.

Once cooled place on a clean kitchen towel.


Now, fold the towel over the top and squeeze the moisture out. You will be surprised as to how much water is held within cauliflower.


Keep squeezing until you have soaked up as much water as humanly possible! 


Once ready, place into a clean dry bowl, mix in an egg and mozzarella cheese, this is going to be the binder. I should have used half an egg for mine since it wasn't the whole cauliflower head, I added back in too much moisture with the egg.


I had to end up squeezing some the egg out, so it would hold. This is pretty messy, but mixing actually works better with your hands. I also mixed in some salt, pepper, and garlic powder to season it.


I placed mine on a cookie sheet with cornmeal... and it stuck to the tray, I didn't have parchment paper so I tried working with what I could. I just shaped it as you would a dough for a pizza crust.


Place it in the oven and bake for 14 minutes.


Once par baked take it out and add topping of your choice. I just stuck with sauce and cheese.


Now bake until your cheese is melted to your liking or toppings are cooked, I baked mine for about another 10 minutes, keeping an eye on it.


It had an amazing crisp and crunch on the ends.


Hey it looks like a pizza right?!


Next time I would use less egg, and when I bake it I would use parchment paper, as it took me a while to pry it off in one piece with a spatula. The middle wasn't as crispy as I wanted, so next time I will make it thinner as well as place another cookie sheet on top of it while the crust bakes with some sort of weight on top. I think that would help yield a crispier crust all over.




Wednesday, April 15, 2015

Mushroom Risotto


I am pretty certain I have shared my mushroom risotto before, maybe about a year ago, so I wont really go into making it, risotto is not a particular dish, but a cooking method of cooking rice, so I wont bore you with the details if you already know hoe to make it. However I wanted to share what I added into this batch, of course I added the mushrooms, onions, and garlic as per usual, but I also added some cherry tomatoes to this, asparagus, and carrots, they are difficult to see under all of that Parmesan cheese, but this was my favorite veggie combo that I have done with risotto. I really think this is going to be my go to combination for risotto. Risotto is one of my very favorite things to make.

Friday, April 10, 2015

Penne Mushroom Alfredo


Yes you read that right, Penne Mushroom Alfredo. Why penne? Why not penne? Penne is my very favorite kind of pasta. Truth be told, I use to love alfredo, and olive garden sort of ruined that for me, not that it is bad, olive garden has excellent alfredo, I just got tired of being around it so much, and smelling it. Now that I have been gone from there for a good while, I find myself wanting alfredo more so than when I was there. I don't eat it very often though, it is a treat, and isn't something you would eat every day, every now and again is alright though.

I truly love this recipe, and it is one I sort of just threw together with what I had in the refrigerator like usual. Chris and I had an awesome mushroom alfredo ravioli at maggianos before he left, so that was my inspiration. 

I diced onions, mushroom, and garlic, and sauteed those in some butter, until tender and caramelized. Once caramelized, I just turned them down to low heat and left them alone. I seasoned them with pepper, and no salt, because I wanted to make sure this wasn't going to be over salted, as I will be adding Parmesan to the sauce which is pretty salty.

For the sauce, I melted a bit of butter, and added flour to make a roux, don't cook too long, just until you get a slightly thick consistency, I made a white roux which is the easiest and takes the least amount of cook time, this one is good for keeping white sauces white and beautiful, though I could have made a blonde which is a bit of a deeper flavor than whites. I could have made this in retrospect because the mushrooms changed the tone of my sauce.

After making the roux I whisked in 1/2/ cup heavy cream until it thickened, I then added some almond milt to it, to thin it out because it was a bit too thick for me. After this I added in 1/4 cup of sherry wine (this gives the flavor such depth!) and then brought it to a boil, and reduced to a simmer, I allowed it to simmer for about 15 minutes, and then tossed in the sauteed mushrooms, onions, and garlic. At this point I added some Parmesan cheese.  I probably added about 1/8th a cup, gave it a taste, and then seasoned it a bit more with salt and pepper.

I boiled some vegetable penne, and just served the sauce on top of the pasta, and served with some additional Parmesan over the top.

Wednesday, April 8, 2015

Steak!


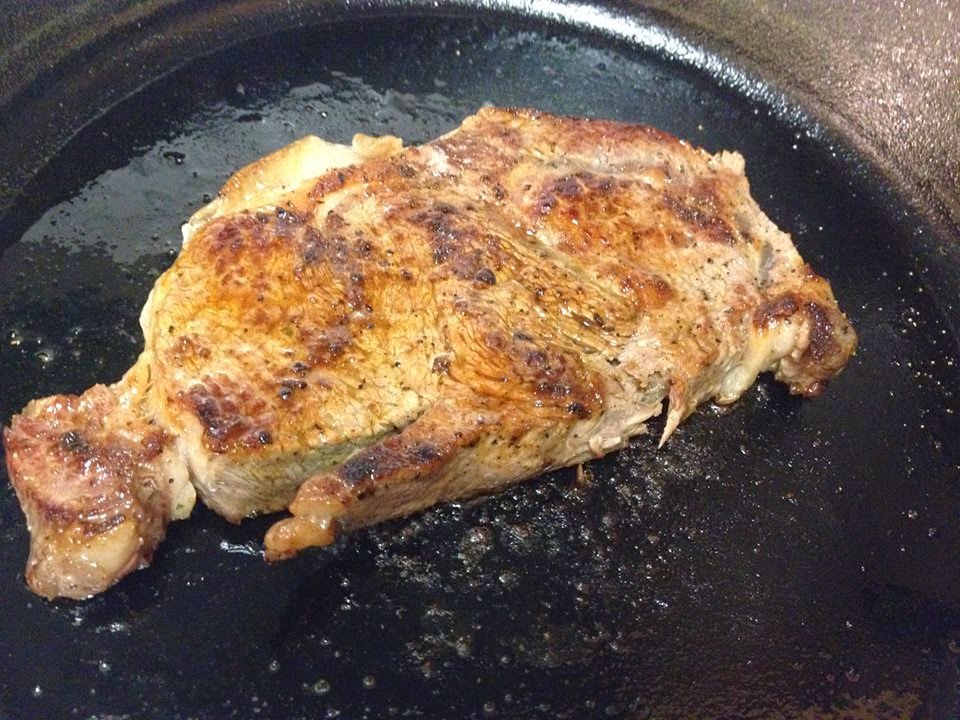
I tend to not eat meat that often, but this day... I was just seriously craving meat, and what better way to satisfy that craving than a steak?! This one is huge! I didn't make anything to go along with it, because it was so large. This was actually really simple and delicious.

I started with a rib-eye, I don't have a grill, otherwise if I did it would have beautiful grill marks. I seasoned both sides with pepper, lawrys seasoning salt, and garlic salt. I went easy on both the lawrys and the garlic, since I was using both. I melted a bit of butter in a cast iron skillet, got it to high heat and then put in about a cap full of liquid smoke. I love the grilled smokey taste, and since I don't have one this helps give it that smokey, grilled flavor.

I cooked the steak until golden on both sides, and then tossed the skillet in the oven at 400 to finish cooking to my liking, it only took maybe 3 minutes in the oven. I love medium rare steaks, but you can cook it more or less depending upon how you personally enjoy your steaks.

And well that is it! Another easy yet tasty dinner. You could saute onions or mushrooms to amp it up, or make a lovely sauce to go along the top. I love Bearnaise with steaks, but this day I just wanted a classic grilled/smokey taste.  

Friday, April 3, 2015

Brussels Sprouts!


I have recently become obsessed over Brussels Sprouts, they are so delicious and easy to cook! I couldn't believe I have never made or had these as an adult, probably because I hated them as a child. I found the base of this from Laura Vitale from Laura in the kitchen, she used lemon zest in hers and I didn't have a lemon when I made them, so I just used lemon juice, from the predone bottle of lemon juice.


I just started with cutting these in half and pealing of the outer layer, and of course rinsed them. 


After cutting them I just tossed them in some salted boiling water, only for three minutes, just enough time to parboil, until they turn bright green. You really do not need to boil them long at all, because we want the end result to be crispy not mushy!


Just strain these into a clean strainer after they are done par boiling. Just allow them to sit while you prep the garlic and olive oil.


I went ahead and sliced two garlic cloves, thinly. Don't mince it, slice it! :) You will get a crisp on the garlic to go along with the sprouts. A normal person would probably only slice one cloves; however, if we have met, you know I just absolutely love garlic! It is funny because before culinary school I hated garlic, onions, and black pepper, crazy right?!


Get a good amount of olive oil really hot in a saute pan. We are using a generous amount because we want to get a nice golden color on these and we want them crispy! Texture makes all the difference in vegetable! I remember in school, my chef had said most likely when people say they don't like vegetables, they have never had them cooked properly, and that is 100 percent true with me when it comes to these sprouts. I have only ever had them mushy, and when you boil the hell out of theses they are mushy, disgusting, and smell like feet, why would you want to eat something like that? So be generous with the olive oil and get it super hot, so you hear these babies sizzle when they hit the pan.


Once the oil is hot, place the Brussels Sprouts cut side down, and reduce the heat from high to medium high after they've been in for about 45 seconds to a minute. 


Allow them to cook on each side about 3-4 minutes, depending on just how crispy you'd like them.


Season to taste with salt, pepper, and lemon zest. (If you don't have zest, you can substitute with lemon juice as I did, though they would be better with zest. Fresh zest is strong and fragrant).


Once they have obtained beautiful color, toss in the sliced garlic, and cook for maybe a minute, stirring the garlic around so it doesn't burn, and turn off the heat immediately.


Finally, enjoy these beautiful veggies, you always hated as a child. This recipe is so simple yet absolutely delicious and divine. I have literally made this five times, and I just cannot get enough of them! A friend of mine told me to bake them as well, that they obtain a great crisp that way as well, so I need to try that out!

Check out Laura in The Kitchen, this is where I obtained her recipe,but I followed my own  feel for ingredient amounts with my own personal taste. 


Friday, March 27, 2015

Quinoa Bowl


This has been one of my absolute favorite go to meals for dinner, it is super easy, quick, and absolutely delicious. This is also a pretty healthy dinner choice as well. I do apologize for not having measurements. When I follow a guided recipe than I have the measurements, as well as I always measure when I bake, but when I come up with my own, I never measure.

This is pretty simple though, and you can use about how much of each ingredient you personally feel that you would enjoy going upon your own taste preferences.

I start with boiling some quiona, sometimes I use red, sometimes I use tricolor, sometimes I use a garlic flavored quinoa. I boil a portion of it, usually a 1/4th of a cup... doesn't sound like a lot? Well you are going to be adding a lot of vegetables to this, this is a portion for one though. When I boil it, I boil it with vegetable broth as opposed to water, it adds more flavor, who doesn't like more flavor?

While it's boiling, a slice tomatoes, and mix them in with frozen corn, and pinto beans from a can, and i just saute them all together over medium heat, until cooked and soft. At the end I toss in the minced garlic and cook for just a minute, and turn the heat off so it doesn't burn. To this I add salt, pepper, cumin, paprika, and lime juice. Season to taste.

Once the quinoa is done cooking, I toss in the veggies, give it a taste, and season more to my liking with all seasonings if it needs it. I also stir in some cheddar cheese, not too much, you don't want to over power your veggies, you just want enough to balance it. The very last step is the most important one to me, adding your avocado. I love avocado! I love it so much I could and have just eaten a whole avocado for a snack! Naturally, I am using the entire avocado in my bowl, so I just slice it on up and stir it in lastly, you do not want to add it to the sauteing veggies, unless you want it mushy.

Wednesday, March 18, 2015

Cauliflower Cheddar Soup

Cauliflower Cheddar Soup is something I have always wanted to make but never did. My original plan was to replace the cream in the soup with almond milk, or coconut milk... but well let me explain. I was going to blog about my first time making butternut squash soup, and this was when I said I was going to be going vegan again.... and well... it was not good at all. The coconut was way to overpowering, and it did not have that velvety "creamy" texture that I love in a butternut squash soup. It was a complete disaster, a total flop, that I didn't even eat it... and wasted two pounds of squash, and I hate to waste food, but why save it when I know for a fact it will just sit and rot in my refrigerator.

So I decided to keep the cauliflower soup with cream, this was quite simple and delicious, and absolutely perfect on a cold snowy day. This did make so much soup, though... enough that I had three huge bowls, two small bowls.... and still some left over that I just didn't finish in time. The blog in which I got the recipe from can be found on Cooking Classy  In her recipe she uses white cheddar and parmesan, I used a little parmesan but sharp yellow cheddar, as it is what I had on hand, and it was lovely.


Ingredients
  • 1 large head cauliflower (2 - 2 1/2 lb), cored and chopped into small, bite size pieces
  • 2 Tbsp olive oil
  • Salt and freshly ground black pepper
  • 3 Tbsp butter
  • 1 cup finely chopped yellow onion
  • 3 1/2 Tbsp all-purpose flour
  • 1 clove garlic, minced
  • 3 cups milk
  • 1 (14 oz) can low-sodium chicken broth
  • 1/2 cup heavy cream
  • 1 tsp dried parsley or 1 Tbsp chopped fresh
  • 1/4 tsp (slightly heaping) dried thyme or 1 tsp chopped fresh
  • 1 bay leaf
  • 1/4 tsp granulated sugar
  • 4 oz shredded sharp white cheddar cheese, shredded (1 cup), plus more for serving if desired
  • 1 oz finely grated parmesan cheese (slightly packed 1/4 cup)
 
Directions
  • Preheat oven to 425 degrees. Place cauliflower on baking sheet, drizzle with olive oil and toss to evenly coat, then spread into an even layer and season lightly with salt and pepper. Bake in preheated oven until golden, about 25 minutes. Remove from oven and set aside.
  • In a large pot, melt butter over medium heat. Add in onion and saute until tender, about 4 - 5 minutes. Add in flour and cook, stirring constantly 1 1/2 minutes, adding in garlic during last 30 seconds of cooking. While whisking, slowly pour in milk followed by chicken broth and cream. Add in parsley, thyme, bay leaf, sugar, roasted cauliflower and season soup with salt and pepper to taste (I used 1/2 tsp salt but this may vary depending on how much salt you added to your cauliflower and how much salt you prefer). Bring to a boil, stirring constantly, then reduce heat to low. Puree 3 cups of the soup in a blender (being careful as your working with hot liquids) and return to soup in pot. Remove from heat and stir in sharp white cheddar and parmesan cheese. Serve warm garnished with additional shredded white cheddar and serve with fresh bread or croutons if desired. 
 

Monday, March 16, 2015

Buffalo Chicken Calzone

This was actually one of the first meals I made when Chris left. I was craving something buffalo flavored, you know when you get those insane intense cravings, and they just will not disappear until you have fulfilled that craving?! Well that is what I was having. I didn't follow a recipe. I apologize, a lot of the things I cook, I don't follow recipes for. Cooking is different than baking. In cooking, you can add things to make things better, things don't have to be precise. Baking is the opposite, baking, your measurements need to be perfect, if they aren't you are... well... you are fucked. Seriously... I can recall so many formulas I have tried to do on a whim, that have failed, failed miserably.


I did bake a dough... What I did, was I took my favorite pizza dough recipe and I halved it. Even halving it, I split the actual dough in half and froze the remainder. For the dough I mixed in my stand mixer, 3 cups of bread flour, and then I dissolved 2 teaspoons of fresh instant yeast in 1/2 cup of warm water, lukewarm. I then added a 1/2 teaspoon of sugar to the warm water/yeast. The sugar is "food" for the yeast, let it sit until it smells fragrant, and it frothy. Add this to the flour, mix with a dough hook, and add about two tablespoons of olive oil, this can vary upon how the texture is looking, once mixed for a while, I added 1/2 teaspoon of salt. It is important not to add the salt directly to the yeast, added salt directly to yeast, is like added salt onto a fresh wound, it is going to scald it, and it wont rise as well. Once the dough has come together, coat oil in a bowl, place the dough in it, place thin layer of oil on the dough to prevent "skin" from forming. Place the dough in a warm spot to proof for an hour. I usually place mine in the microwave (NOT RUNNING), just because it's a nice dark warm spot that wont be disturbed. Once the dough has risen to your liking, take as much or as little as you want. Roll it out to a good size.

Be sure to place cornmeal on your pan so the dough doesn't stick, or flour, but I find corn meal works best.  I layered down franks red hot buffalo sauce (it's my favorite, but use your favorite) and then I placed mozzarella cheese on top of that, then my precooked shredded chicken. I cooked the chicken in the oven, not all the way, so it wont become over cooked. I salted and peppered it, and smothered it in buffalo sauce. Once you layer your precooked chicken, top with some more cheese, and a thin line of ranch dressing, or more if you like more. Pinch the dough together, and cut slits on the top of the dough, to allow steam to release.  Bake at 425 for 20-30 minutes depending on how crisp and brown you like your crust. Serve with addition buffalo sauce, ranch, both, or none.


Friday, March 13, 2015

Philly Cheesesteak Stuffed Pepper

I have been trying to eat pretty healthy for the most part since Chris has been gone, I mean sometimes the meals I prepare are not the healthiest, but eating in moderation is what is important. I have been really enjoying this because it is helping me become more creative in the kitchen, while making amazing foods. I already have a list of foods and recipes I need to make for Chris, when he returns home. Some dinners are not the healthiest, like an upcoming recipe I will be sharing, a buffalo chicken calzone, but when I make things such as that, they are usually one days I have ran, and usually it's when I have eaten fruit for breakfast and a salad or a smoothie for lunch. I am taking that break off from running, but I am still going to eat what I want, when I want, but like I said, in moderation. Moderation is key.

Ok so I wanted a Philly cheesesteak sandwich, however I didn't want to drive into Philly, and I also wanted to make it healthier. Key word here is healthier, not healthy, this does contain 2 slices of cheese and some fat from the steak, and a bit of butter, so I am not saying this is healthy, but a healthier alternative to your traditional steak sandwich.

Let's get started. I first took a green pepper, sliced it in half, and removed the seeds, and the ribs. Set this aside. Preheat your oven to 400. Slice and dice some onions and mushrooms, enough to fill both sides of the pepper. I sautéed this in a couple tablespoons of butter for added flavor. Once these were tender and caramelized, I added in thin strips of steak tips, good quality, I used ribeye strips. Do not cook these all the way, just until slight brown, still with some red, if you cook it fully it will overcook in the oven. Also toss in some minced garlic at this point if you want. I love garlic so I put it in everything. You want to do this at the end so it doesn't burn. Also season with salt and pepper to your own taste preference.


Once the filling is ready line both pepper halves with a layer of provolone cheese. I apologize for how my pan looks, it is clean but really scratched, worn, and torn, from use. I need new pans!
 
 
Now simply top with filling, I made a lot, but I am using all of it!


Once your filling is in the pepper halves, top each half with another piece of provolone cheese.


And bake, this should take 20 minutes.  ( side note- I did not prebake the peppers, but I definitely would actually prebake them next time, because I like a nice soft sautéed pepper. I would prebake till tender, then stuff, then bake to get nice color as well as a nice smoke on the cheese; however, they were still delicious).


This picture is about a 10 minute bake time.... bake for 10 more minutes and... you have..


... beautiful peppers. This was so delicious, single handedly the best thing I have ever made! Like I said, I would prebake the peppers next time, for a more tender pepper, but that is the only thing I would change. I had one for dinner, and saved the other half for lunch the next day. I cut the half, in half so you could see the filling.
 
 
Very juicy in the middle, and the steak was still tender, seasoned perfectly and absolutely amazing. You must try this! I consider this healthier then the steak sandwich because there isn't bread in it, it is about half the calories, and still just as tasty and delicious.


Wednesday, March 4, 2015

Red Velvet Crinkle Kiss Cookies

You better damn well know this is going to be a bomb ass cookie as it is Laura Vitale's creation from Laura in the kitchen! Find her original recipe and webpage HERE! And many other delicious recipes. Every recipe of hers that I have tried has been pure bliss.
 
Now I doubled her recipe because I wanted to make enough for us and for Chris' work, because they were asking for more treats! I made these at the beginning of January, I have just been saving the photos to blog this!
 
Here is Laura's recipe:
 
 
Makes about 2 dozen
Prep time: 15 mins
Cook time: 15 mins

Ingredients:
1 1/3 cup of All Purpose Flour
2/3 cup of Granulated Sugar
3 Tbsp of Cocoa Powder
1/4 cup of Unsalted Butter, softened at room temperature
1 tsp of Baking Powder
1/4 tsp of Salt
2 Eggs
Red Food Coloring
1 tsp of Vanilla Extract
1/2 cup of Confectioner Sugar
Unwrapped Hershey Kisses

Process,
1) In a bowl, whisk together the flour, cocoa powder, salt, baking powder, set aside.

2) In the bowl of a standing mixer fitted with a paddle attachment, cream together the butter and sugar, add the vanilla and eggs and mix until creamy and smooth.

3) Add the dry ingredients and mix them in long enough to combine and add enough food coloring to achieve the intense red color you’re looking for.

4) Place the dough in a bowl, cover and refrigerate for a minimum of 3 hours or up to overnight.

5) Preheat your oven to 350 degrees, line a couple baking sheets with parchment paper and set aside.

6) Using a small ice cream scoop or two spoons, form little balls of dough and coat them in the confectioner sugar, place them a couple inches apart on your prepared baking sheets.

7) Bake the cookies for 10 to 12 minutes, remove from the oven, allow them to sit for 2 minutes (they will deflate a bit) and then place a little kiss
 
 
And Now Photos of the process! 


Don't they just look amazing?!
 
Make them! They are super delicious and Easy
 
And here is Laura's video where she makes them!
Check out her website and Youtube, she is amazing!


Images by Freepik